Update Your XR Glasses
Update Your XR Glasses' Firmware
Before using your XR Glasses, we highly recommend updating the firmware for a better experience and advanced features.
View the firmware release history here.
Update XR Glasses' Firmware on Android Phones & Tablets
You can use an Android device with a USB-C port to update your XR Glasses' firmware. Even if your Android phone or tablet doesn't support DP Alt Mode, you can still use it for updating the firmware.
If the update process is stuck at MCU 100% and the permission request does not show up within 5 seconds, try unplugging the USB connection and reconnecting. Or, restart the Neckband Remote app then tap UPDATE NOW to go on to update DP firmware.
Update Your XR Glasses Firmware via SpaceWalker
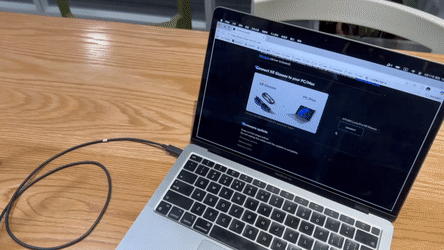
SpaceWalker for Mac and Windows also offers a simple way to update your XR Glasses to the latest firmware. Click the links for more information on SpaceWalker for Mac and Windows.
Update Failed
Firmware update can fail in several ways. Please follow the instructions that apply to your specific situation.
Luma Ultra XR Glasses
If the screen is blank and the electrochromic film is unresponsive:
Press and hold the L+ and L- buttons.
While holding the buttons, connect the XR Glasses to your computer (see diagram below).
Once connected, release the buttons.
If you are using Windows (if you are using macOS, skip to Step 5):
4.1 Download and open Zadig.
4.2 Select the Luma Ultra XR Glasses and click Install Driver. If Luma Ultra XR Glasses does not appear, repeat Steps 1–3 and try again.

4.3 Wait until the installation is complete.

Return to the firmware update page.
Select Luma Ultra XR Glasses from the list and click Connect. If Luma Ultra XR Glasses does not appear in the list, repeat Steps 1–3 and try again.
Once connected, click Update and wait until the update process is complete.
If the screen is blank but the electrochromic film is responsive:
Go to the firmware update page, connect XR Glasses normally, and perform a standard update.
Luma Pro XR Glasses
If the screen is blank:
Go to the firmware update page and follow the standard update process. Since there are multiple modules that need to be updated, you may need to repeat the update 1 to 3 times (Need to plug and unplug devices) depending on the issue. We apologize that this process isn't automated at this time. After a maximum of 3 attempts, please check to see if the issue has been resolved.
Important Note
If you are using a Windows computer with a Qualcomm chip, you may experience update issues. We recommend using a different computer for the update.
Calibrate Your XR Glasses' IMU
We recommend calibrating your XR Glasses' IMU after updating the firmware. A calibrated IMU will give you a lower drift rate and higher accuracy. You can also choose to enable/disable Wearer Detection.
Additionally, Luma Ultra XR Glasses doesn't require IMU calibration. This page doesn't support the Luma Ultra XR Glasses.