SpaceWalker for Mac
Introduction
SpaceWalker for Mac is an application that runs on Mac and works with XR Glasses manufactured by VITURE. It allows you to project multiple virtual screens onto your XR Glasses from your Mac device, and supports multiple layout switching to adapt to your operating habits.
By default, the virtual screen is locked in space (6DoF on Luma Ultra XR GLasses, 3DoF on our other XR Glasses). You can also unlock the fixation of a single direction according to your personal habits, so that the screen moves with your head.
Of course, you can also use keyboard shortcuts to adjust the size of the screen display, or reset the screen to the center of your field of view.
SpaceWalker for Mac also adds features to improve ease of use, such as automatically turning off the MacBook's display when SpaceWalker is launched, or automatically turning off the electrochromic film when it detects that you are looking down, making it easier for you to use the keyboard.
Download the lastest SpaceWalker for Mac.
Click here to view the SpaceWalker for Mac release notes and full update history.
Get Started
Get Started with Your XR Glasses
Follow these steps to ensure the best experience with your XR Glasses:
Note: Auto-calibration requires the latest firmware, so complete the first two steps before proceeding.
System Requirements
Hardware: Mac with the USB-C port (with the Thunderbolt symbol), Thunderbolt 3, Thunderbolt / USB 4, and Thunderbolt 4.
Explore more at Identify the ports on your Mac.
Software: SpaceWalker for Mac v1.2.3 and later requires macOS Ventura 13.0 or higher.
If you're using macOS Monterey 12.4 or later, the last compatible version is v1.2.2. Download v1.2.2.
Starting from v1.6.0, Intel-based Macs are no longer supported. If you're using a compatible macOS version but have an Intel-based Mac, please download the latest supported version: Download v1.5.0 Important: Luma Ultra support begins from version 1.7.0. Since v1.7.0 and above no longer support Intel-based Macs, Luma Ultra is not supported on any Intel-based Mac.
Supported Languages
SpaceWalker for Mac supports:
The display language defaults to English but will switch to your system language if it's supported.
Install & Launch
Download and Installation
Grant Screen Recording Permission
SpaceWalker requires Screen Recording permission to display the virtual screens on your XR Glasses. Here's how to grant permission:
Connect Your XR Glasses
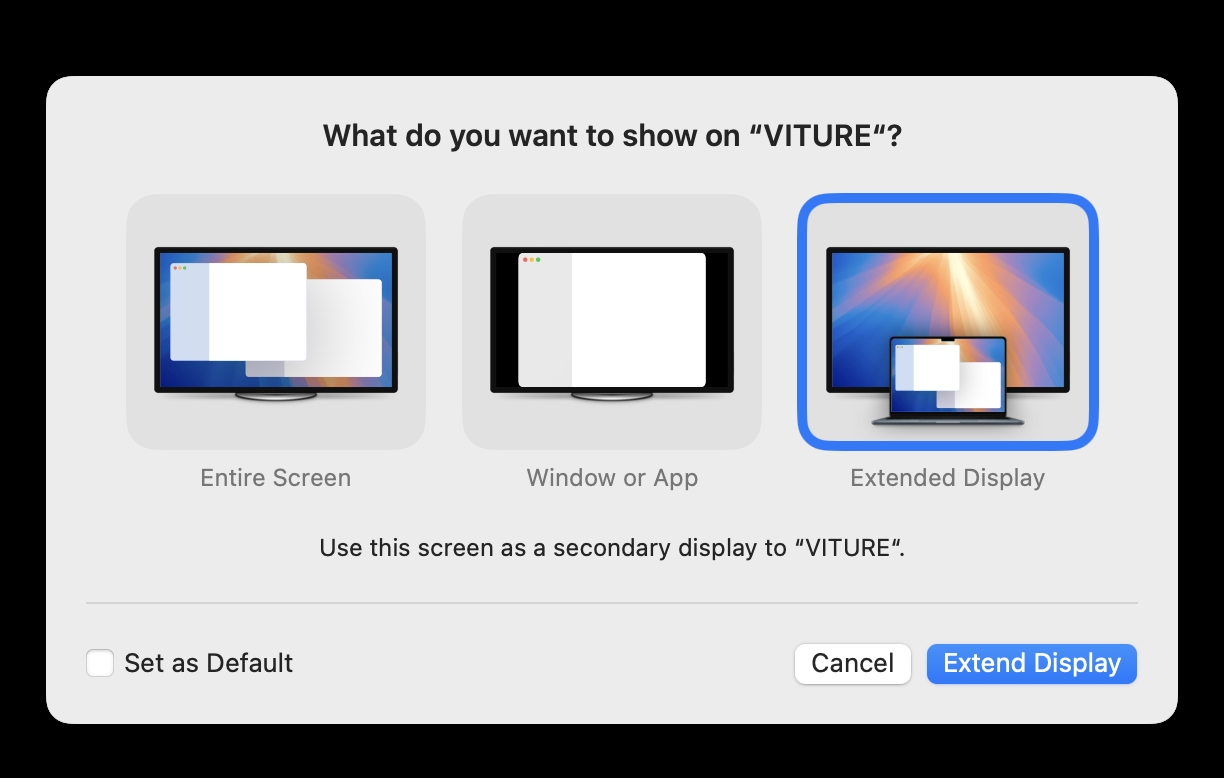
Note: When connecting XR Glasses for the first time, a dialog may appear. Select "Extended Display" and check "Set as Default" in the bottom-left corner. This dialog may appear twice during the initial setup; follow the same steps each time.
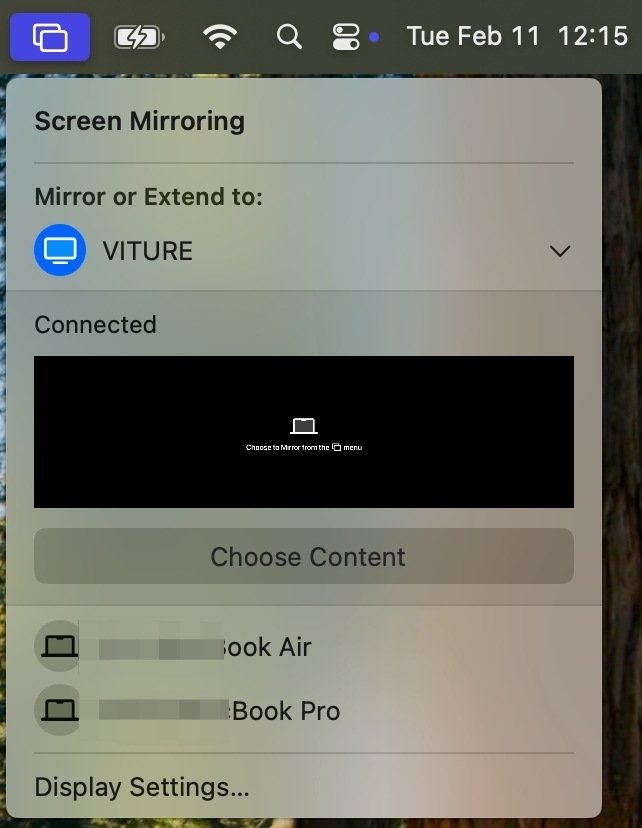
If the dialog above does not appear and the display on the XR Glasses shows a black screen with the text "Choose to mirror from the menu" (as shown in the image below), this typically occurs when enabling 3D Mode or switching to 120Hz. In this case, click the menu bar and select "VITURE" as the Extended Display.
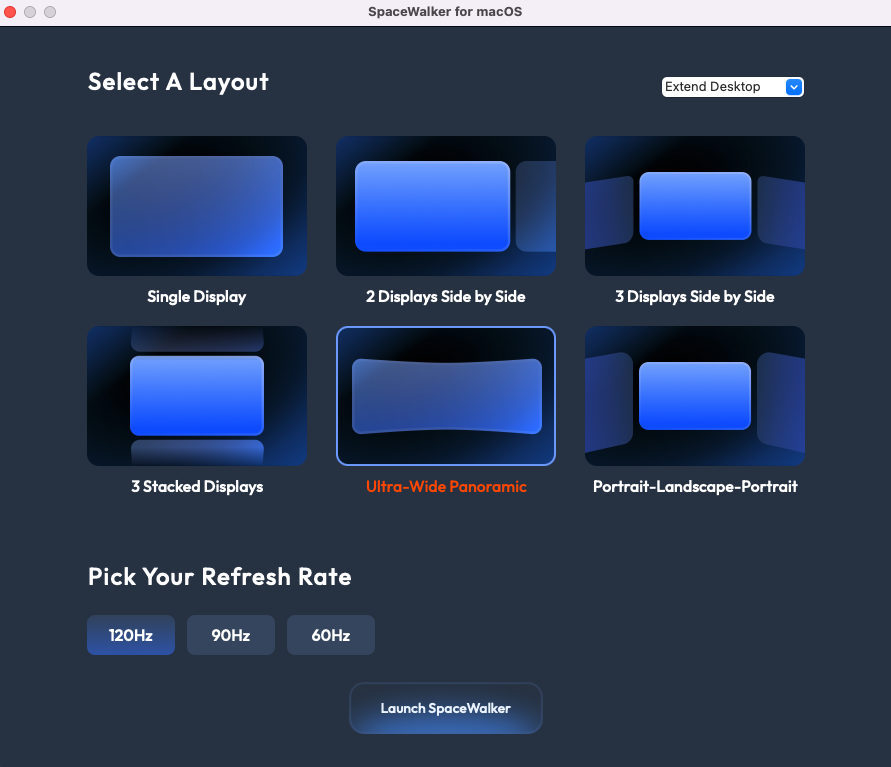
Select Display Layouts
Once connected, you'll be presented with various display layout options on the launch page. Choose your preferred layout:
Changing the Theme Background for a More Immersive Experience


Tips: Only equirectangular projection format (360° panoramic format) is supported for image uploads. Other formats will cause stretching and distortion, which may affect your visual experience.
Select a Refresh Rate
Available for: VITURE Luma, Luma Pro, Luma Ultra, Beast, and Pro XR Glasses
For supported models, SpaceWalker allows you to choose a refresh rate (120Hz, 90Hz, or 60Hz) each time you launch the app with your XR Glasses connected.
The app remembers your last chosen setting and applies it automatically on the next launch.
How It Works:
For instance, if you set 60Hz for the XR Glasses in System Preferences, but choose 120Hz within SpaceWalker, your XR Glasses will run at 120Hz while the app is open. After quitting the app, it returns to 60Hz.
Refresh rate cannot be changed while the app is running. To apply a different refresh rate, please disconnect and reconnect your XR Glasses.
Mirror or Extend Your Desktop
You can also choose what appears on your XR Glasses.
SpaceWalker remembers your last used settings and will automatically select them upon launch.
Quick Controls
You can quickly access the settings by clicking the SpaceWalker icon in the menu bar.
If you're using XR Glasses that support multiple refresh rates (on SpaceWalker for Mac v1.2.2 or later), the current refresh rate will be displayed in the menu for quick reference.
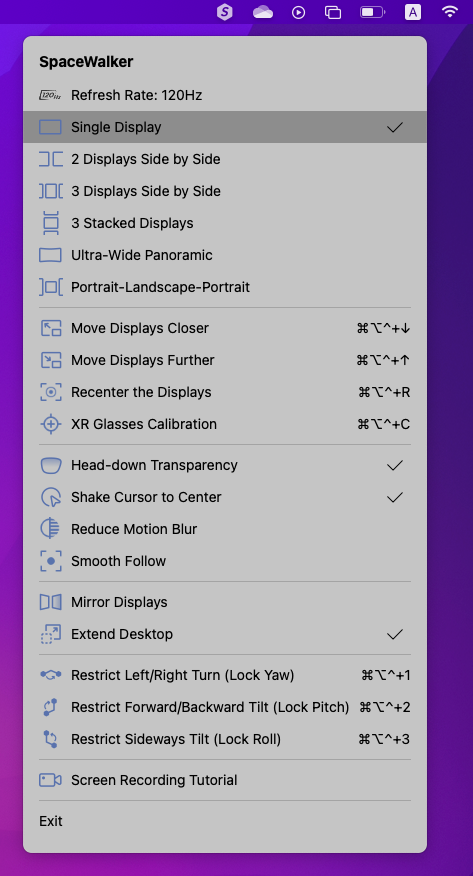
Switch Display Layouts
You can quickly switch between six display layouts from the menu bar. Open windows will remain open when you change layouts.
Move Displays
Use the menu bar or keyboard shortcuts to move displays closer or further apart (like making them bigger or smaller).
Recenter Displays
Press Control-Option-Command-R (⌥+⌃+⌘+R) to recenter the displays on your XR Glasses.
You'll receive a notification to recenter the displays if they move outside your field of vision.
Head Tracking Correction
Available on VITURE Luma Pro XR Glasses
When enabled, Head Tracking Correction uses real-time position data to enhance the 3DoF experience by improving stability and responsiveness.
If you're already satisfied with the current 3DoF performance, you can leave this option turned off.
Auto-Calibrate
Available on VITURE Luma Pro XR Glasses
The VITURE Luma Pro XR Glasses support automatic calibration to improve 3DoF stability. The calibration result is saved for a more consistent experience.
How to Auto-Calibrate:
You may occasionally receive a message prompting you to auto-calibrate. If you notice display instability, you can repeat the steps above at any time.
XR Glasses Calibration
Shortcut available on VITURE Pro, One, and One Lite XR Glasses
Starting with version 1.2.2, SpaceWalker for Mac offers a new calibration feature to calibrate the XR Glasses.
Calibration fixes drift, which is the gradual movement of the display over time. Unlike Recenter (Ctrl-Alt-Cmd-R) which adjusts the center point for your current position, calibration aims to improve long-term stability. If you plan to stay in a fixed position while using SpaceWalker, calibration is recommended.
Calibration Steps:
Recentering or disconnecting your XR Glasses will clear the calibration data. You'll need to recalibrate following these steps again.
If you plan to stay in a fixed position while using SpaceWalker, calibration is recommended for long-term stability.
However, recentering remains useful for occasional adjustments based on your posture changes.
Features
Head-Down Transparency
Enable this feature to temporarily see through your XR Glasses when you tilt your head downward—ideal for typing on a keyboard or viewing your surroundings without removing the glasses.
Note: This feature is only available on XR Glasses equipped with electrochromic film. It is not supported on models without it, such as the VITURE One Lite XR Glasses.
Auto-Disable Built-In Display
Turn off your Mac's built-in display while using SpaceWalker (except in Extend Desktop mode).
Note: Due to changes in macOS Sequoia, auto-disable built-in display is currently unavailable within SpaceWalker.
Shake Cursor to Center
Can't find your cursor? Shake your mouse or make circles on the Trackpad to bring it back to the center of the screen.
Reduce Motion Blur
If you experience discomfort while turning your head quickly, enable 'Reduce Motion Blur' to minimize motion blur and eye strain.
Be aware that this feature may slightly darken the display on your XR Glasses.
This feature is available starting from version 1.2.2.
Smooth Follow
Enable 'Smooth Follow' for virtual displays to seamlessly follow your head movements, similar to a tripod.
However, this feature automatically disables 3DoF functionality. Therefore, we recommend using Smooth Follow only with single display layout, not layouts like 3 displays or the ultra-wide display.
This feature is available starting from version 1.2.2.
Lock Movements
SpaceWalker allows you to "pin" the displays in a specific position using three degrees of freedom. You can also lock movements if you want the displays to stay fixed regardless of your head movement.
Lock/Unlock Left and Right Directions (Yaw): Control-Option-Command-1
Locks/Unlocks movement when turning your head left or right.
Lock/Unlock Up and Down Directions (Pitch): Control-Option-Command-2
Locks/Unlocks movement when tilting your head up or down.
Lock/Unlock Head Side Rotation (Roll): Control-Option-Command-3
Locks/Unlocks movement when tilting your head to your shoulder.
Theme
You can choose and switch between different theme backgrounds to enhance your immersive experience — or even customize your own background.
Select the "Theme" option from the menu. You can choose from six available themes, including:
After selecting "Custon Theme", you’ll need to choose and upload an image from your local device.
Tips: Only equirectangular projection format (360° panoramic format) is supported for image uploads. Other formats will cause stretching and distortion, which may affect your visual experience.
Screen Recording
SpaceWalker offers a variety of visually-appealing display layouts and built-in support for 3 degrees of freedom (3DoF). If you want to capture your point of view and share it with others, follow these steps:
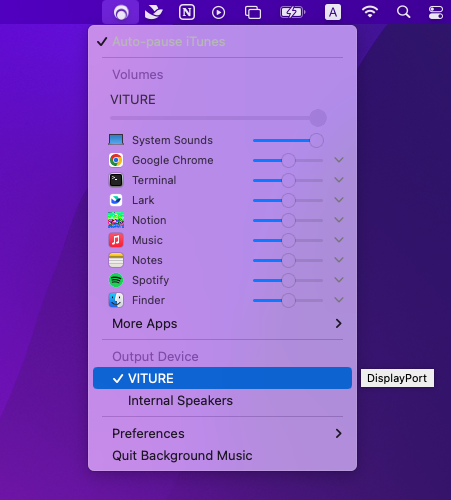
Prepare Screen Recording
After installation, connect to your XR Glasses, then click the menu bar on your Mac and select "VITURE" as the Output Device.
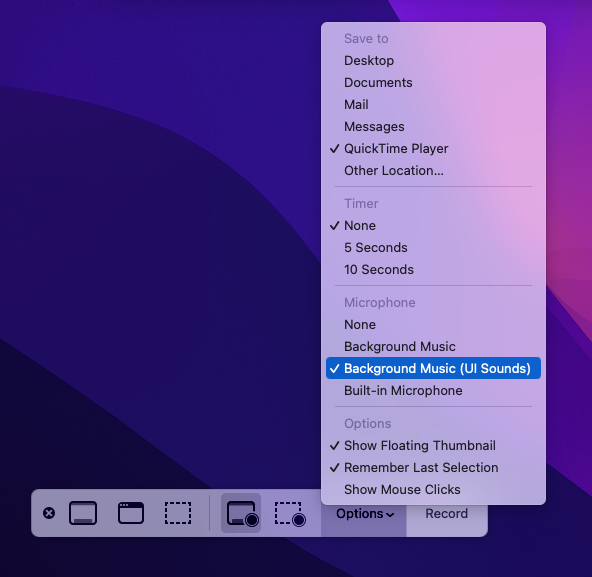
You can record system audio with Background Music. With Background Music running, launch QuickTime Player and select File > New Audio Recording (or New Screen Recording, New Movie Recording). Then click the dropdown menu (⌄) next to the record button and select Background Music as the input device.
You can record system audio and a microphone together by creating an aggregate device that combines your input device (usually Built-in Input) with the Background Music device. You can create the aggregate device using the Audio MIDI Setup utility under /Applications/Utilities.
Start Screen Recording

Other Settings
Access these options within the SpaceWalker app menus.
Restore Default Settings
Resets all SpaceWalker settings to their original state.
Check For Updates
SpaceWalker will notify you when a new update is available. You can also manually check for updates here. Downloading the latest version is available upon clicking "Update."
Send Feedback
Report any issues you encounter while using SpaceWalker. Clicking this option will send anonymous log files to VITURE to help us improve the software. Log files do not contain any personal information.