SpaceWalker for Windows
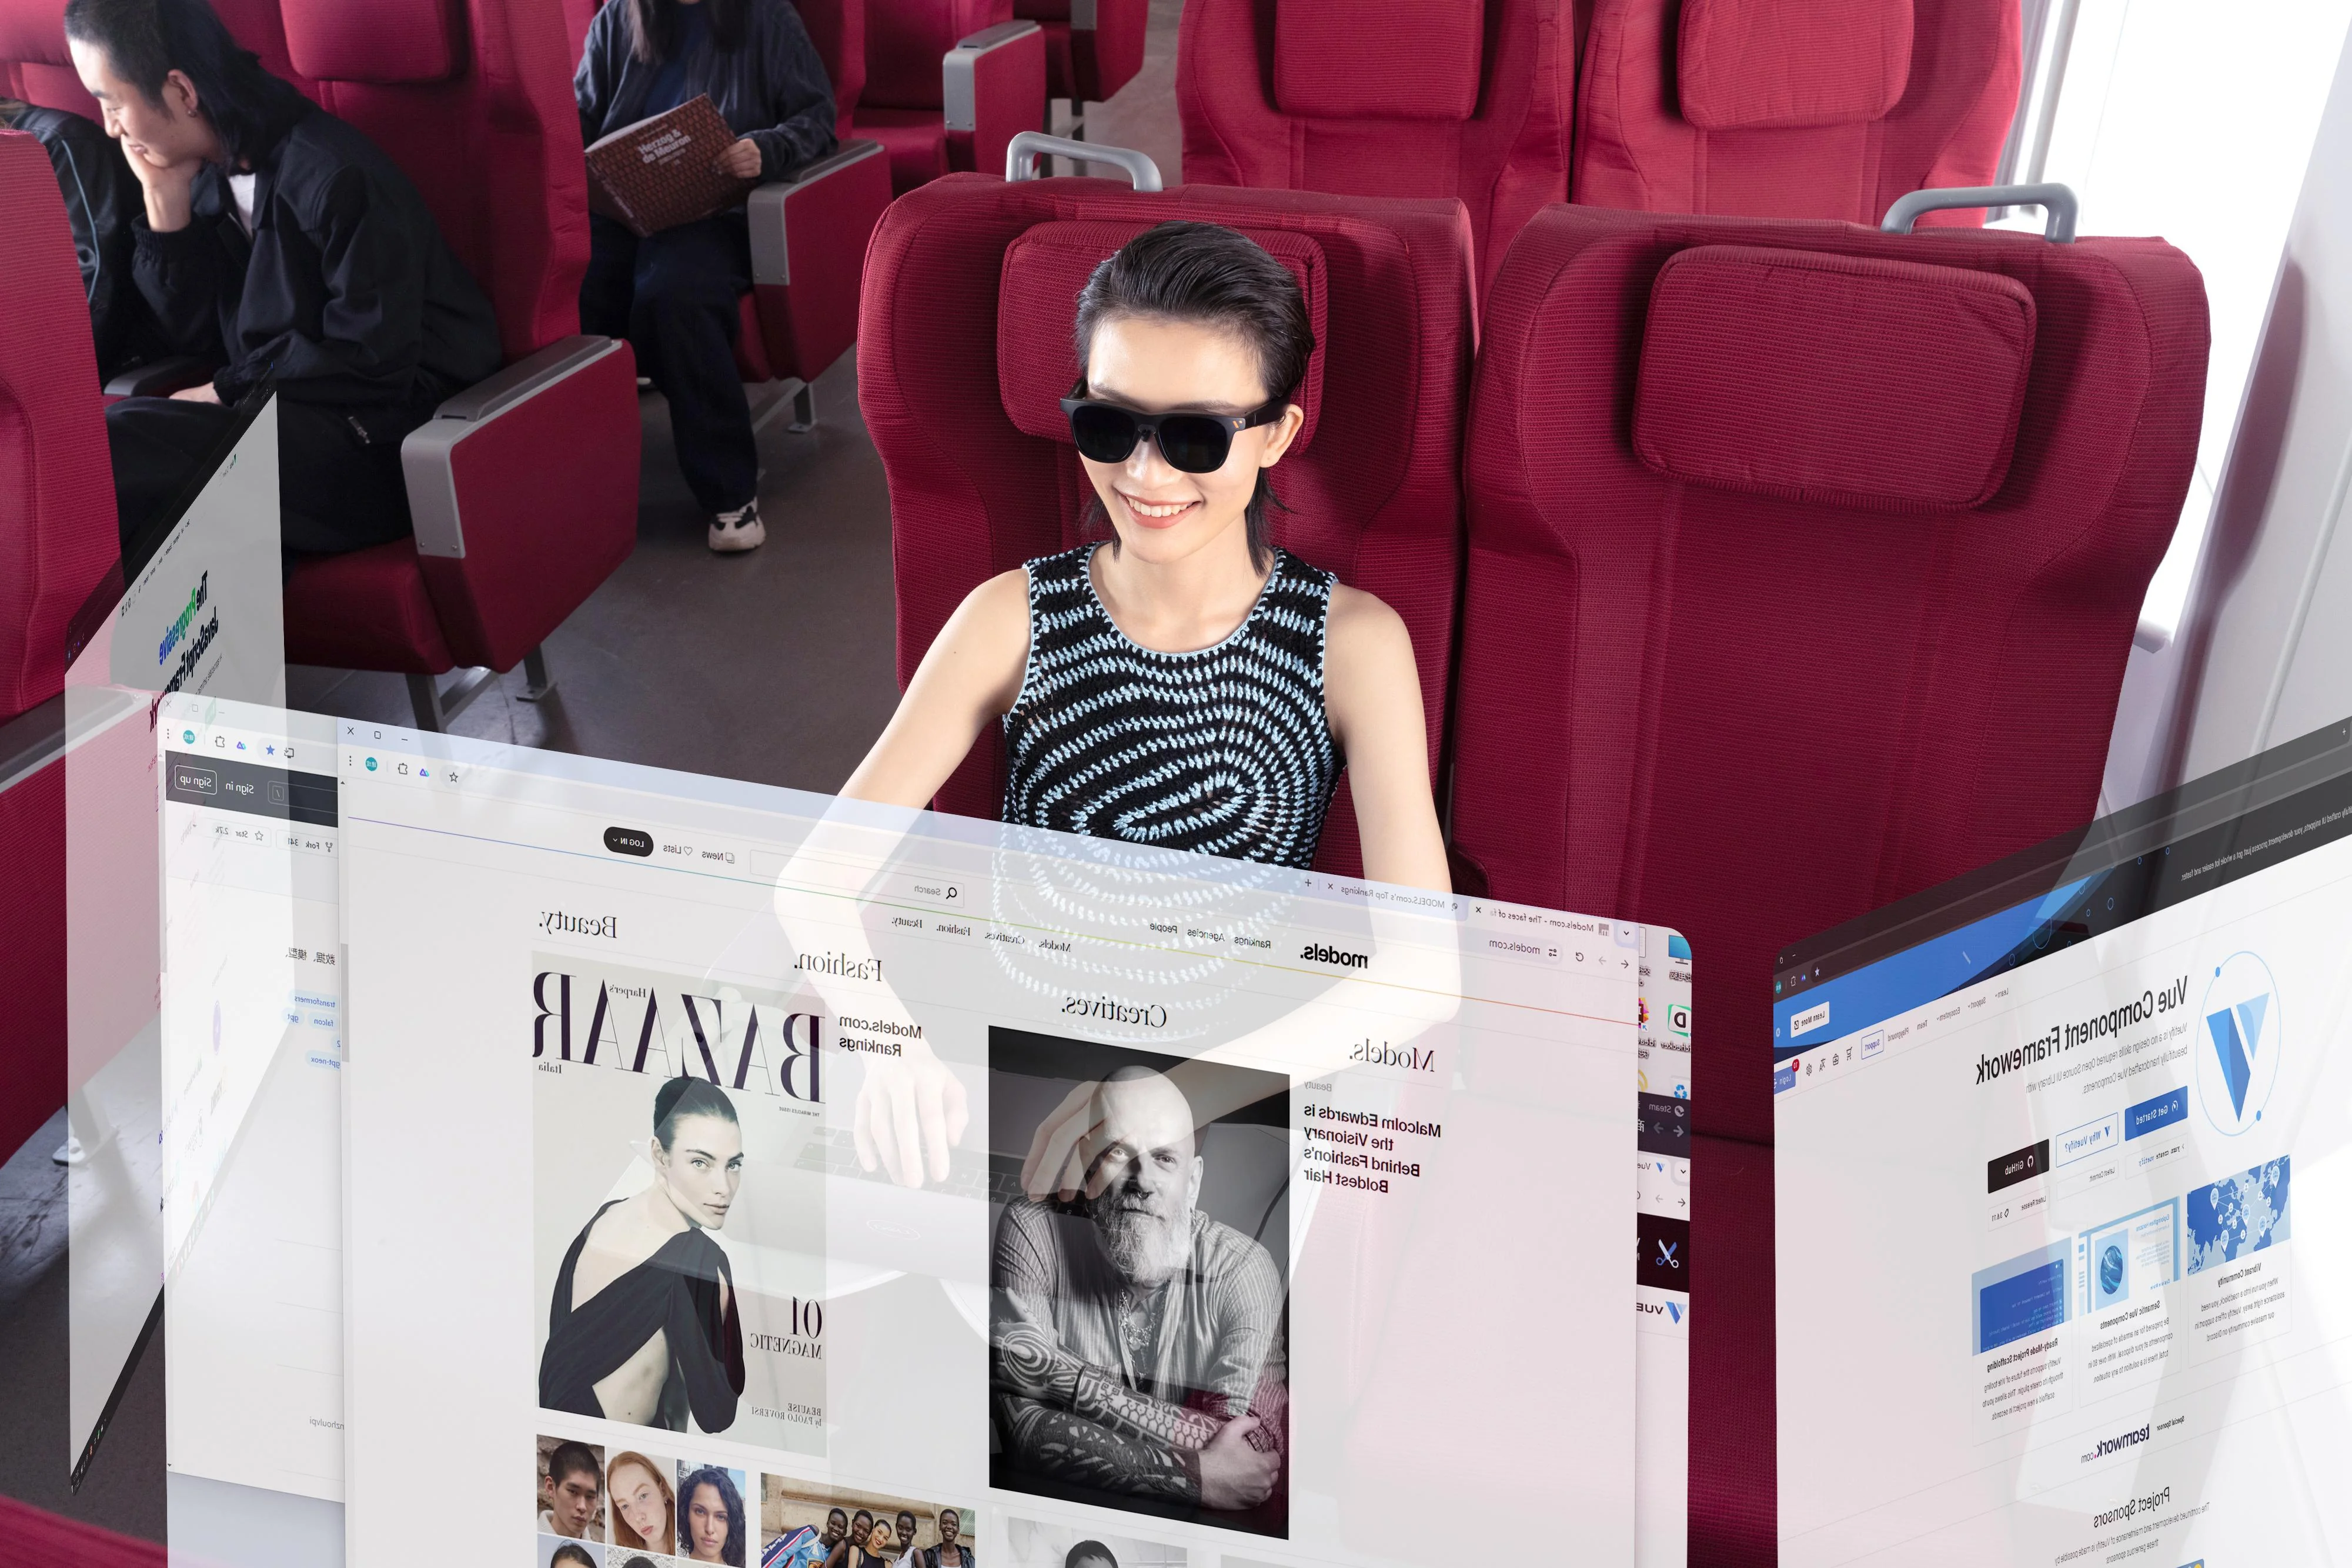
SpaceWalker for Windows seamlessly integrates your PC with VITURE XR Glasses, projecting multiple virtual displays that allow you to tailor your workspace with customizable layouts that adapt to your workflow or play style!
Download the lastest SpaceWalker for Windows.
Click here to view the SpaceWalker for Windows release notes and full update history.
Introduction to Key Features
SpaceWalker for Windows includes many of the same great features we've been working on in the macOS version — here's a quick overview of what you can expect in the app.
Before Getting Started
Get Started with Your XR Glasses
Follow these steps to ensure the best experience with your XR Glasses:
Note: Auto-calibration requires the latest firmware, so complete the first two steps before proceeding.
System Requirements
To ensure the best experience with SpaceWalker for Windows, make sure your system meets the following requirements:
Currently, the VITURE HDMI XR Adapter and the USB-C XR Charging Adapter are not supported.
Note:
Since SpaceWalker requires significant graphics processing resources, playing games within SpaceWalker is not highly recommended. If you still wish to play games, we suggest running them at 1080p resolution or lower, and at 30fps or less. For devices that meet only the minimum system requirements, playing games within SpaceWalker is not recommended.
Supported Languages
SpaceWalker for Windows supports:
The display language defaults to English but will switch to your system language if it's supported.
Update and Calibrate Your XR Glasses
For optimal performance, update your XR Glasses firmware and calibrate the IMU before using SpaceWalker:
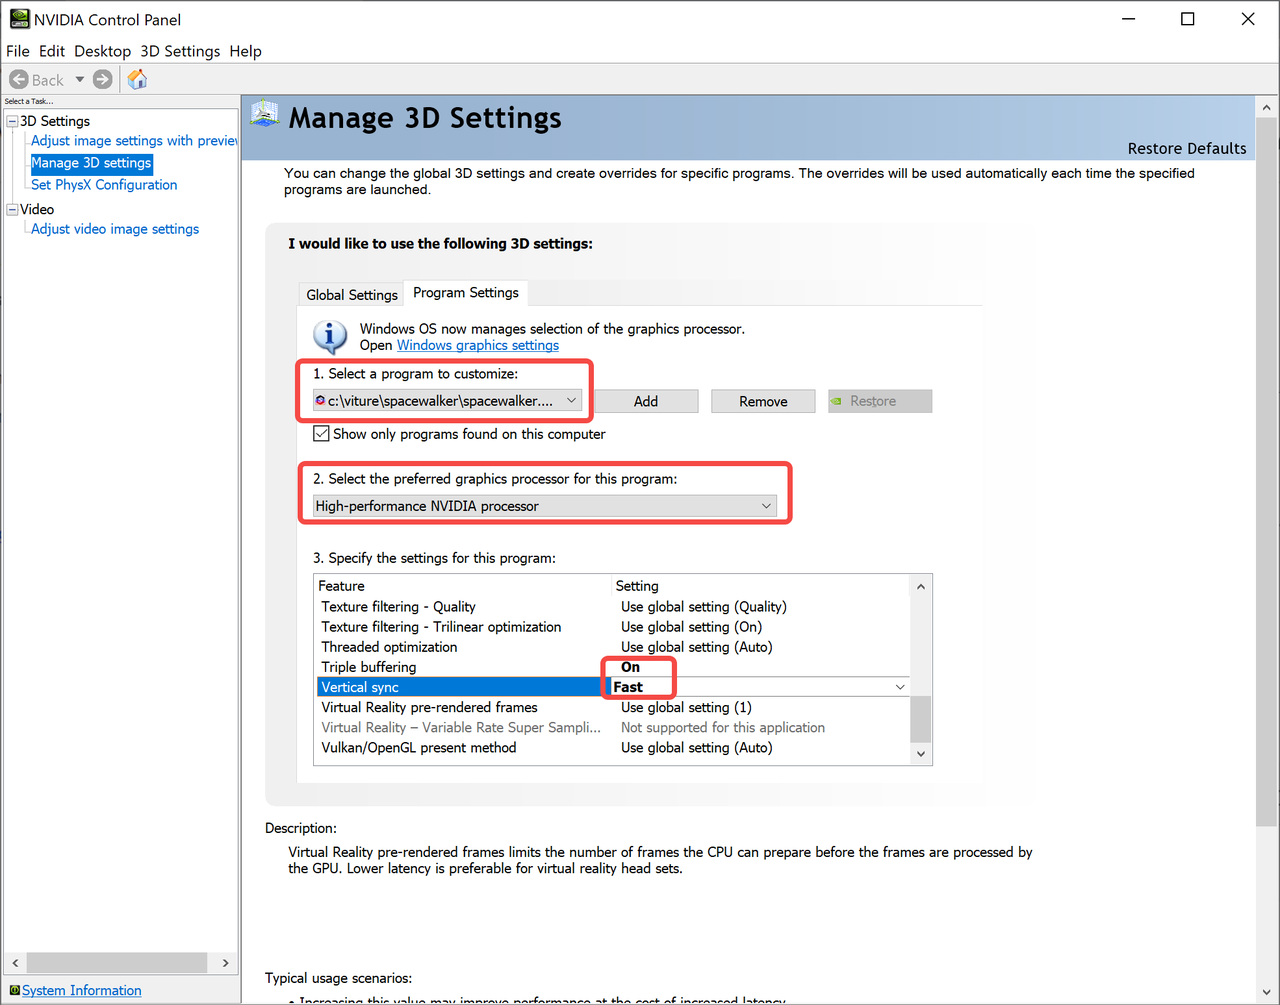
Reduce Screen Tearing
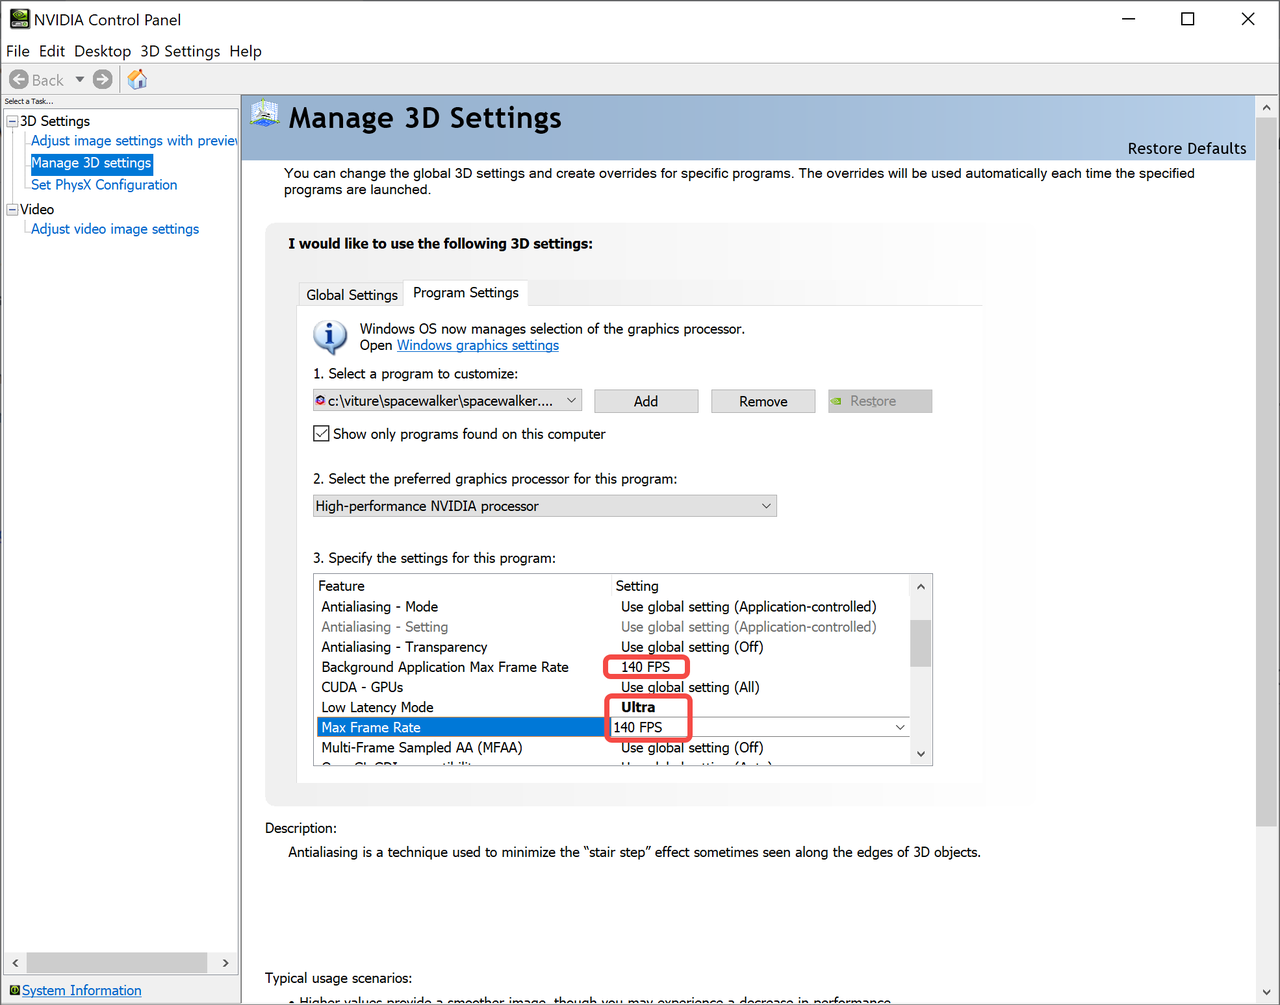
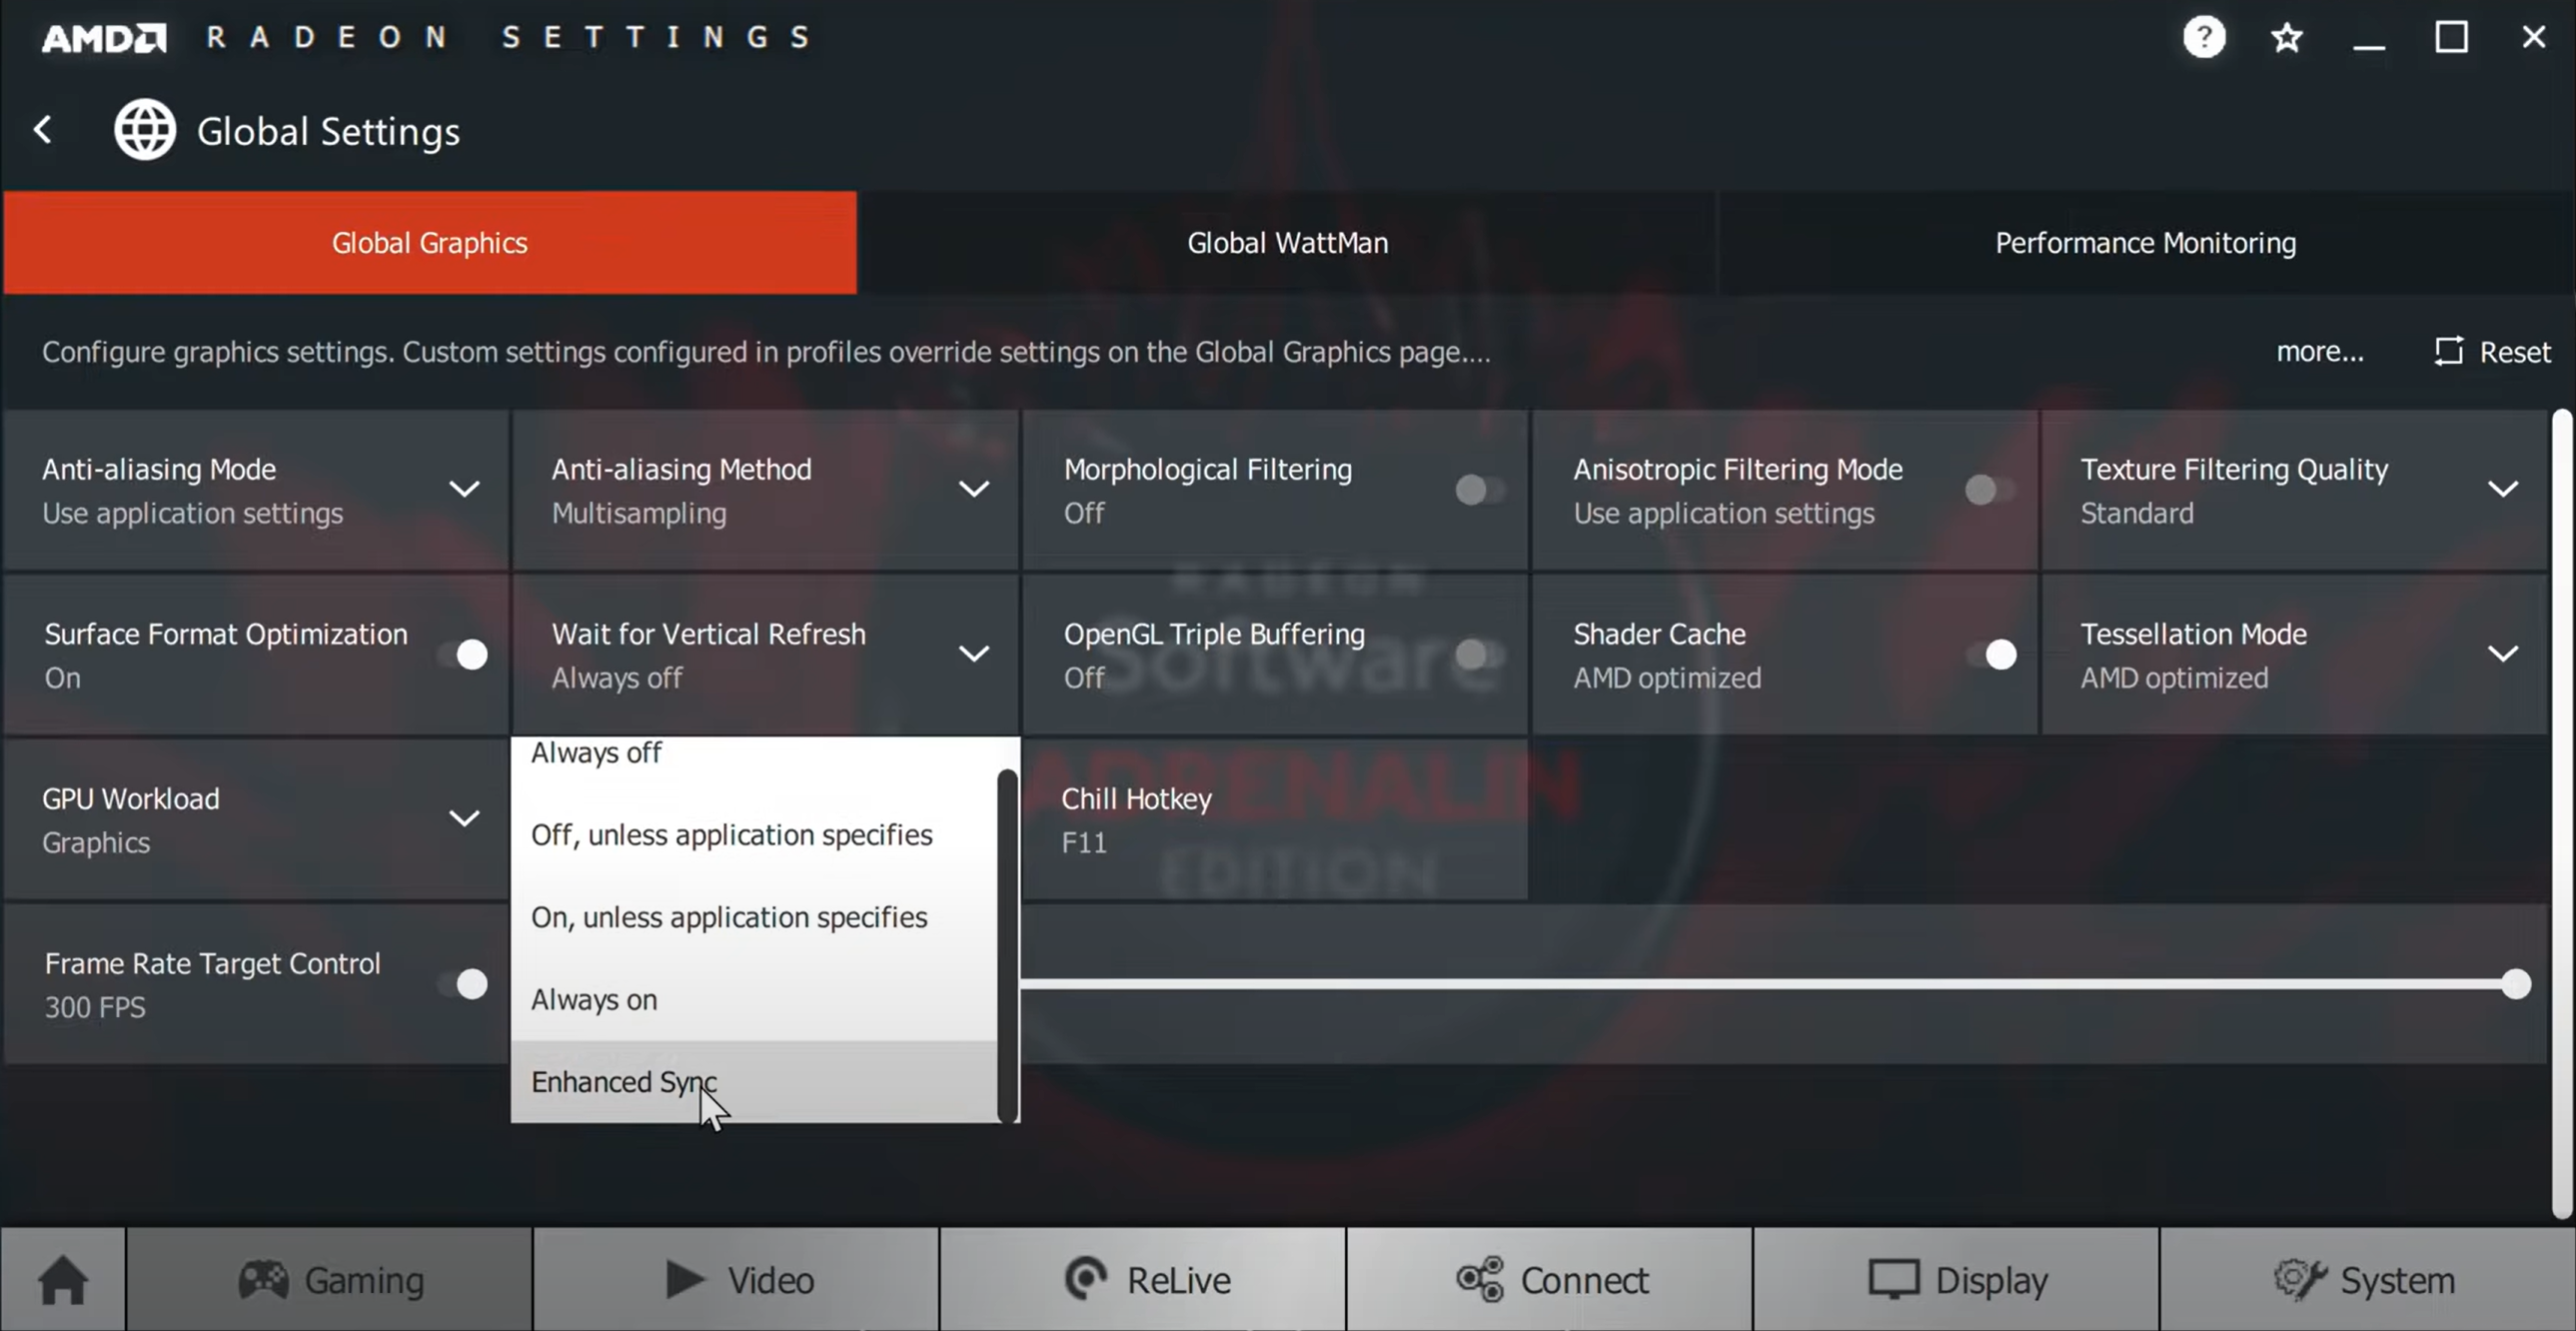
Enable VSync (Vertical Sync) on your GPU to reduce screen tearing and latency while using SpaceWalker:
For NVIDIA GPU:
For AMD GPU:
Installation
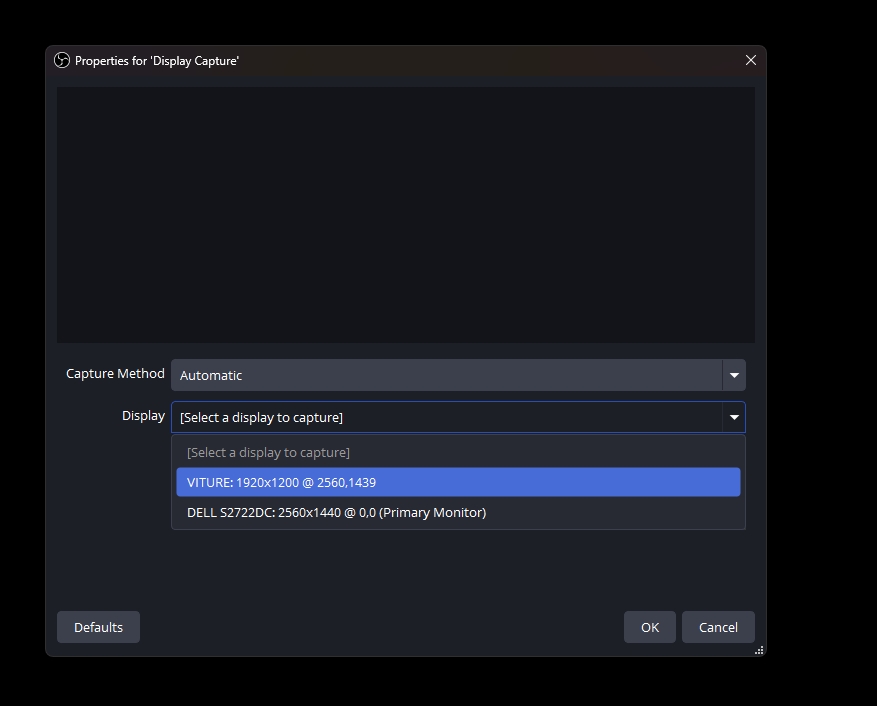
Install Virtual Display Driver
For Snapdragon X Series Windows ARM64 Devices. To use SpaceWalker in Extended or Mirrored mode, a virtual display driver is required.We’ve integrated the open-source SudoVDA virtual display driver into the SpaceWalker installer, However, on ARM-based laptops (e.g. Snapdragon X series), a few system settings must be adjusted before installation.
Installation Steps:
bcdedit /set testsigning on.If SudoMarker is listed, the driver was installed successfully. If not, verify that Test Mode was enabled before installation.
Notes:
Connect Your XR Glasses
SpaceWalker for Windows supports all VITURE XR Glasses. To launch and use the app, your device must be connected to a pair of VITURE XR Glasses.
If your computer's USB-C port is labeled with a lightning bolt symbol, it is likely compatible.
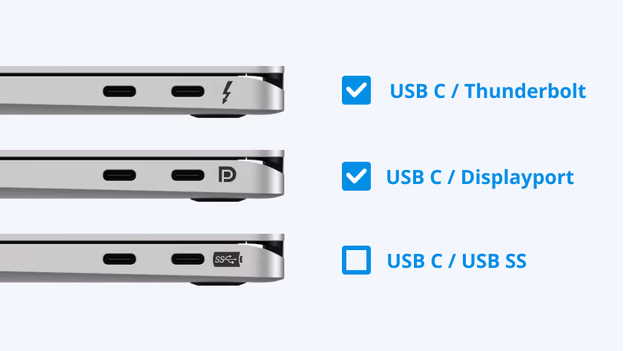
If your laptop or mini PC has a full-featured USB-C port:
This means the port supports data, audio, video, and power transmission. Simply connect your XR Glasses directly to this port.
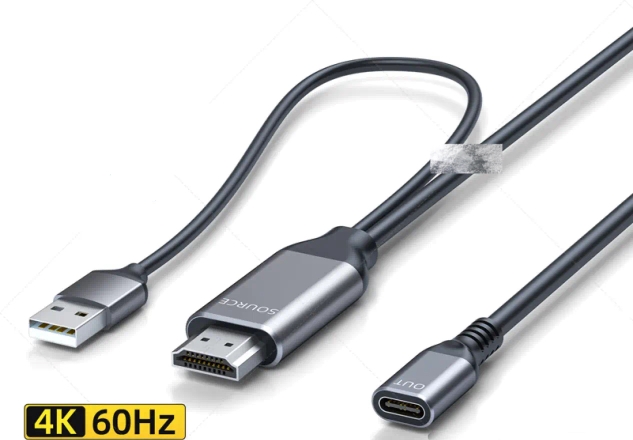
If you're using a PC with a standalone graphics card:
You'll need a DP + USB-A to USB-C adapter or an HDMI + USB-A to USB-C adapter to create a full-featured USB-C connection.
Important Notes:
Launch SpaceWalker
If SpaceWalker is stuck on the "Connecting to VITURE XR Glasses" screen, refer to the "Connecting Your XR Glasses" section above to troubleshoot the connection.
Select a Display Layout
Choose from six available layouts to optimize your virtual workspace:
Mirror or Extend Your Desktop
Decide how your virtual screens interact with your PC's display:
Select a Refresh Rate
Available for: VITURE Luma, Luma Pro, Luma Ultra, Beast, and Pro XR Glasses
For supported models, SpaceWalker allows you to choose a refresh rate (120Hz, 90Hz, or 60Hz) each time you launch the app with your XR Glasses connected.
The app remembers your last chosen setting and applies it automatically on the next launch.
How It Works:
For instance, if Windows is set to 60Hz, but you choose 120Hz in SpaceWalker, your XR Glasses will run at 120Hz while SpaceWalker is active. After quitting the app, it returns to 60Hz.
Refresh rate cannot be changed while the app is running. To apply a different refresh rate, please disconnect and reconnect your XR Glasses.
Update SpaceWalker
If a newer version is available, SpaceWalker will notify you on startup.
Click "Update Now" to download and install the latest version.
Important Notes
Settings and Shortcut Keys
Access Settings
Configure SpaceWalker settings either through the system tray icon or using shortcut keys.
Shortcut Keys
Switch Display Layouts
Quickly switch between six display layouts from the system tray. Open windows will remain open during layout changes.
We've included quite a few shortcuts to make SpaceWalker for Windows easy to navigate.
| Action | Shortcut Key |
|---|---|
| Ultrawide Panoramic | Ctrl + Shift + Alt + 0 |
| Single Display Mirrored | Ctrl + Shift + Alt + 1 |
| 2 Displays Mirrored | Ctrl + Shift + Alt + 2 |
| 3 Displays Mirrored | Ctrl + Shift + Alt + 3 |
| Single Display Extented | Ctrl + Shift + Alt + 4 |
| 2 Displays Extended | Ctrl + Shift + Alt + 5 |
| 3 Displays Extended | Ctrl + Shift + Alt + 6 |
| 3 Stacked Displays | Ctrl + Shift + Alt + 7 |
| Portrait-Landscape-Portrait Extented | Ctrl + Shift + Alt + 8 |
| Portrait-Landscape-Portrait Mirrored | Ctrl + Shift + Alt + 9 |
Other Shorcut Keys
| Action | Shortcut Key |
|---|---|
| Zoom In (Move Displays Closer) | Ctrl + Shift + Alt + ↑ |
| Zoom Out (Move Displays Further) | Ctrl + Shift + Alt + ↓ |
| Recenter Displays | Ctrl + Shift + Alt + R |
| Calibrate XR Glasses | Ctrl + Shift + Alt + C |
| Restrict Left/Right Turn (Lock Yaw) | Ctrl + Shift + Alt + X |
| Restrict Forward/Backward Tilt (Lock Pitch) | Ctrl + Shift + Alt + Y |
| Restrict Sideways Tilt (Lock Roll) | Ctrl + Shift + Alt + Z |
| Quit the App | Ctrl + Shift + Alt + Q |
Move Displays
Use the zoom shortcut keys to adjust the size and distance of your virtual displays:
Recenter Displays
Press Ctrl + Shift + Alt + R to recenter the displays on your XR Glasses.
Head Tracking Correction
Available on VITURE Luma Pro XR Glasses
When enabled, Head Tracking Correction uses real-time position data to enhance the 3DoF experience by improving stability and responsiveness.
If you're already satisfied with the current 3DoF performance, you can leave this option turned off.
Calibrate XR Glasses
Shortcut available for VITURE Pro, One, and One Lite XR Glasses
Calibration fixes drift, which is the gradual movement of the display over time.
Unlike Recenter (Ctrl + Shift + Alt + R) which adjusts the center point for your current position, calibration aims to improve long-term stability. If you plan to stay in a fixed position while using SpaceWalker, calibration is recommended.
If you encounter display drifting during use, we recommend you follow these steps:
Please note that recentering or disconnecting your XR Glasses will reset the calibration data. You'll need to recalibrate your XR Glasses again, starting from step 3, the next time you use them.
If you plan to stay in a fixed position while using SpaceWalker, calibration is recommended for long-term stability. However, recentering remains useful for occasional adjustments based on your posture changes.
Features For Ease of Use
Shake Cursor to Center
Lost your cursor? Shake your mouse or make circles on your trackpad to instantly bring it back to the center of the screen.
Lock Movements
SpaceWalker allows you to "pin" the displays in a specific position using three degrees of freedom. You can also lock movements if you want the displays to stay fixed regardless of your head movement.
Lock/Unlock Left and Right Directions (Yaw): Ctrl + Shift + Alt + X
Lock/Unlock Up and Down Directions (Pitch): Ctrl + Shift + Alt + Y
Lock/Unlock Head Side Rotation (Roll): Ctrl + Shift + Alt + Z
Head-Down Transparency
Enable this feature to temporarily see through your XR Glasses when you tilt your head downward—ideal for typing on a keyboard or viewing your surroundings without removing the glasses.
Note: This feature is only available on XR Glasses equipped with electrochromic film. It is not supported on models without it, such as the VITURE One Lite XR Glasses.
Theme
You can choose and switch between different theme backgrounds to enhance your immersive experience — or even customize your own background.
Select the "Theme" option from the menu. You can choose from six available themes, including:
After selecting "Custon Theme", you’ll need to choose and upload an image from your local device.
Tips: Only equirectangular projection format (360° panoramic format) is supported for image uploads. Other formats will cause stretching and distortion, which may affect your visual experience.
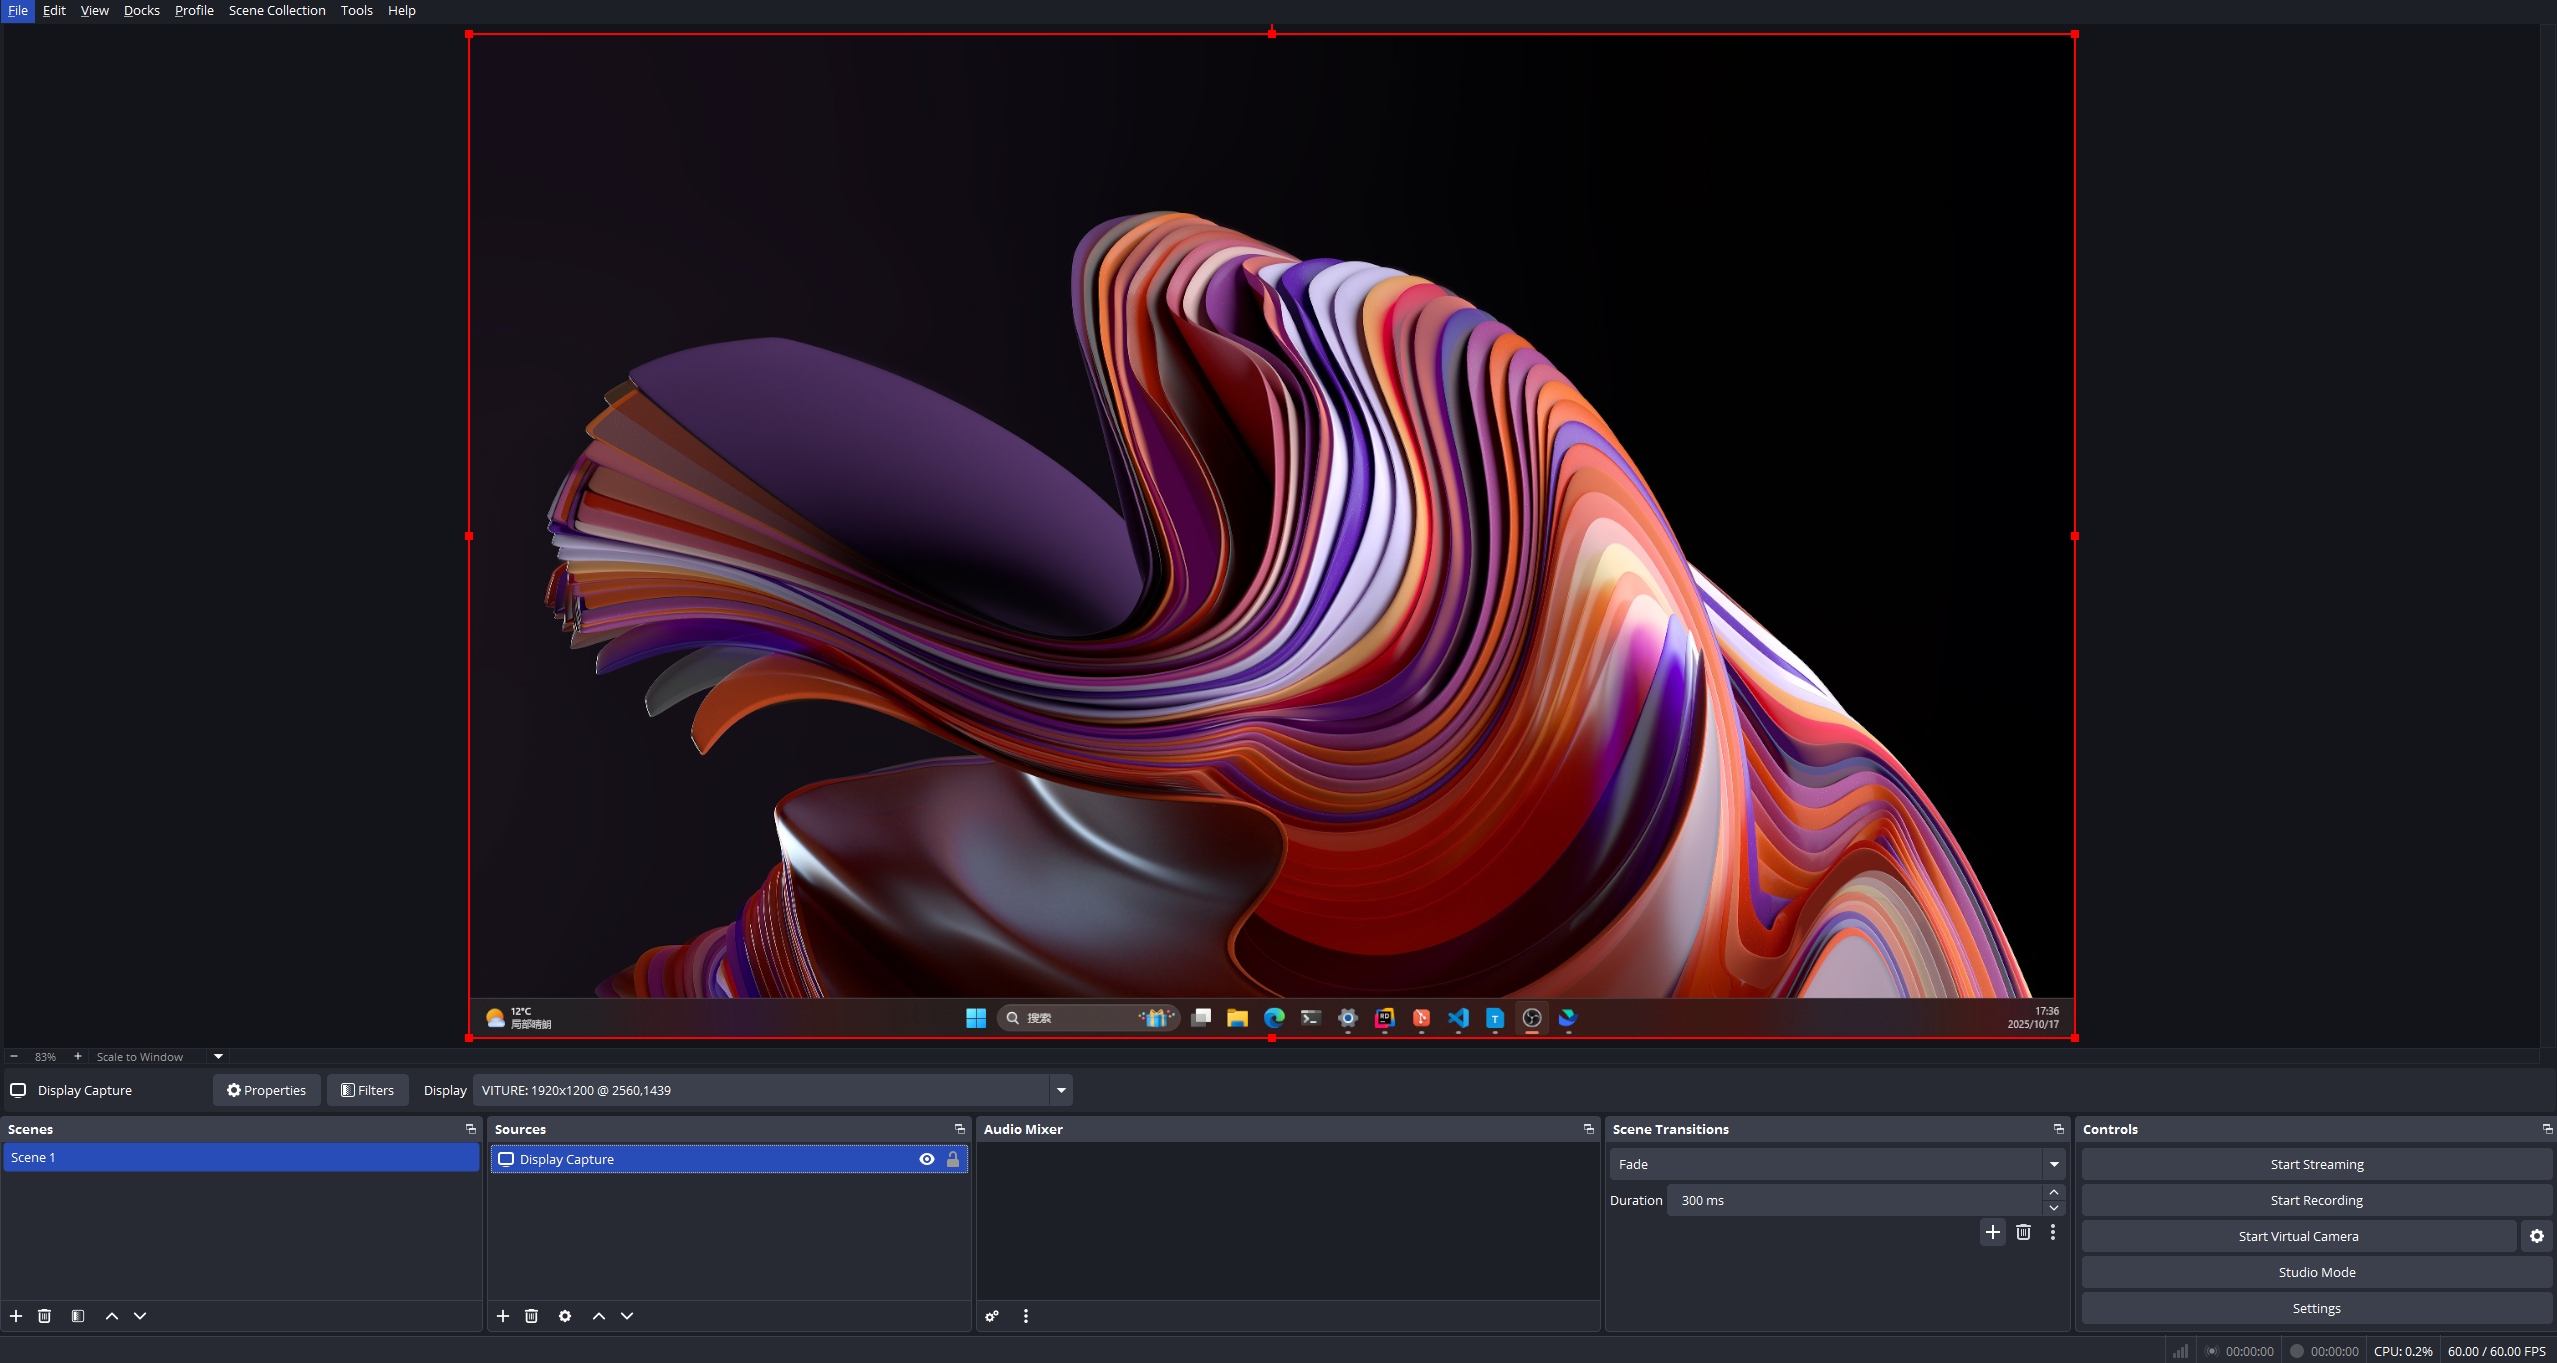
Screen Recording
SpaceWalker offers a variety of visually-appealing display layouts and built-in support for 3 degrees of freedom (3DoF). If you want to capture your point of view and share it with others, follow these steps: